
If your WordPress website is running slow, displaying database connection errors, or experiencing corrupted content issues, a database repair may quickly solve the problem. Fortunately, WordPress includes a built-in database repair tool that allows users to repair and optimize their database in just a few clicks.
In this guide, we’ll explain how to perform a one-click database repair in WordPress safely and efficiently.
What Is the WordPress Database Repair Tool?
The WordPress database repair feature is a built-in utility that checks your website’s database tables for corruption and automatically repairs them. It can also optimize tables to improve website performance.
This feature is especially useful if your website shows errors such as:
- “Error Establishing a Database Connection”
- Missing posts or pages
- Slow admin dashboard performance
- Plugin or theme settings not saving properly
- Database table crashes
How to Enable WordPress Database Repair
To access the repair tool, you’ll need to make a quick change to your wp-config.php file.
Step 1: Access Your Website Files
Use either:
- FTP software like FileZilla
- Your hosting File Manager
- SSH access
Locate the wp-config.php file in the root directory of your WordPress installation.
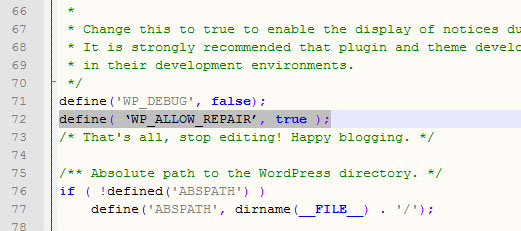
Step 2: Add the Repair Constant
Add the following line above the line that says:
/* That's all, stop editing! Happy publishing. */
Insert:
define('WP_ALLOW_REPAIR', true);
Your file should look similar to this:
define('WP_ALLOW_REPAIR', true);

/* That's all, stop editing! Happy publishing. */
Run the WordPress Database Repair Tool
Once enabled, visit the following URL in your browser:
https://yourdomain.com/wp-admin/maint/repair.php
You’ll see two options:
- Repair Database
- Repair and Optimize Database
For most websites, selecting “Repair and Optimize Database” is recommended because it both fixes corrupted tables and improves database performance.
The process only takes a few moments.
Important Security Step
After the repair completes, remove the following line from your wp-config.php file:
define('WP_ALLOW_REPAIR', true);
This is critical because the repair page does not require a WordPress login while enabled.
Alternative: Repair the Database Using WP-CLI
Advanced users with SSH access can repair their WordPress database using WP-CLI.
Run:
wp db repair
To optimize the database afterward:
wp db optimize
This method is fast and commonly used on VPS or dedicated hosting environments.
Best Practices Before Repairing a WordPress Database
Before performing any database repair, always create a full backup of your website.
Recommended backup methods include:
- Hosting snapshots
- phpMyAdmin database exports
- WordPress backup plugins
Popular backup plugins include:
- UpdraftPlus
- All-in-One WP Migration
- Duplicator
Hosting Providers With Built-In Repair Tools
Many managed WordPress hosting providers offer built-in database repair and optimization features inside their dashboards.
Some popular hosts include:
- SiteGround
- WP Engine
- Kinsta
- Bluehost
These tools can simplify maintenance without editing configuration files manually.
Final Thoughts
The built-in WordPress database repair tool is one of the easiest ways to fix common database issues and improve website performance. Whether you’re dealing with database corruption, slow loading times, or admin errors, running a quick repair can often restore your site without requiring advanced technical skills.
Always remember to back up your site before making changes and disable the repair mode after completion for security purposes.